Ceiling Fan 101
OK, so maybe you don’t get as excited about ceiling fans as we do (there’s still time). But we promise you this—take a minute to go over these fan fundamentals, and you’ll feel smarter AND save money.
THE FAN SHOULD FIGURE INTO YOUR DESIGN PROCESS.
The ceiling fan is a true centerpiece, and it’s never too late to think about how a fan can complete or refresh a room’s look and feel. No matter what style you’re going for any space, there’s a ceiling fan that will incorporate perfectly with any décor. A smorgasbord of finishes to explore, hundreds of designs—we’ve come a long way since the days of your grandmother’s ceiling fan catalog (although it might very well have been a Hunter catalog).

Your fan’s UL listing will tell you what location the fan was design for—the three choices being indoor, damp, and wet. If you want to put your fan in a place where it comes into direct contact with water, make sure the fan has a “wet” UL listing. Fans made for wet or damp locations are built with all-weather blades, moisture-resistant motors and other special features. And remember—only use indoor fans indoors. Even if an outdoor area seems safely covered, humidity can negatively impact the motor and the blades. (It’s perfectly OK to use an outdoor fan indoors, though.)
LOCATION, LOCATION, LOCATION.
SHED SOME LIGHT ON THE SUBJECT.
Don’t overlook lighting! Ask yourself whether you want your fan to provide direct lighting (for accomplishing tasks) or more ambient lighting (for establishing a certain mood or tone in the room). There aren’t any fan companies we know of who look at lighting output the way we do—or who match our variety of ceiling fan lighting choices.
CONTROLS ARE AN IMPORTANT CONSIDERATION.
Think about how remote controls might fit—or not fit—with your lifestyle. A remote control can enhance the performance and operating flexibility of your fan, since many remotes include one-touch multiple speed settings, instant fan “off” operation and full-range light dimming. Pretty fun to do from the comfort of your favorite chair (or wherever you are from up to 40 feet away from the fan). Installing a ceiling fan and remote control is so easy—absolutely a do-it yourselfer—and doesn’t require any professional wiring. Remote control kits include a handheld transmitter for sending commands to the fan and a receiver you’ll either conceal inside the fan canopy our mount just beneath the ceiling.

SLOPED CEILING? NO PROBLEM.
Most of our fans can be mounted on angled or vaulted ceilings—just look for a fan with our Installer’s Choice three-position mounting—and purchase the ceiling adapter accessory. The adapter replaces the ceiling canopy (the “cap” closest to the ceiling and covering the fan’s electrical box).
EXTENSION DOWNRODS—HERE’S THE DEAL
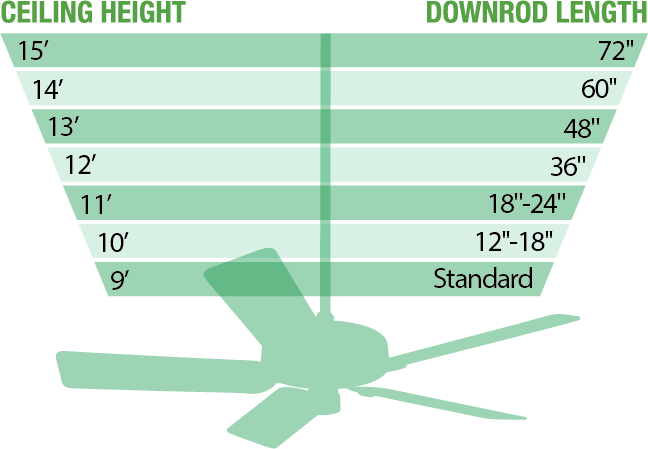
Downrod or no downrod? The answer is, whatever gets your ceiling fan 8 to 9 feet above the floor. That’s what you’re going for to maximize comfort and efficiency. (And no, downrods don’t increase wobble—in fact, they can increase stability.) Here’s a general formula for calculating downrod length:
Ceiling height (in feet) minus 9’ (2,7 meters) = Downrod length
So if your ceiling height is 12 feet (3,7 meters), for example, you’ll need a 3-foot (0,9 meters) downrod to position the fan at 8 feet (2,4 meters) from the floor (the formula allows for additional space that the fan takes up).

WITH CEILING FANS, SIZE MATTERS.
It’s pretty simple—if you’re going for comfort and efficiency, choose a fan that fits your room size. If a fan is too small, it won’t move enough air. Too big, and it could move too much air (translation: brrr). Here’s a general guide to fan size, measured by blade span:

LET’S TALK CFM.
That’s cubic feet per minute—and it’s how air movement is measured. What’s so great about air movement? The more air you move, the greater the wind chill effect—and that’s what makes you feel cooler. (Fans cool people, not rooms! Hard to believe, but true.) And here’s where we have to brag a little—Hunter fans generally move more air than other models because we custom-engineer our motors and pitch our blades at the maximum possible angle.
“BIG SAVINGS ON HEATING AND COOLING COSTS.”
OK, let’s break down this wind chill effect into dollars and sense. A ceiling fan can make a room feel six to eight degrees cooler than the actual ambient temperature (so an 80° room feels like 72°.) Now your air conditioner doesn’t have to work as hard. Nice! What about winter? Don’t make the mistake of turning off your fan. Instead, run it clockwise to push warm air down and gently recirculate it without creating a cooling effect. Congrats—you just saved up to 47% on cooling costs and up to 15% on heating costs. (Of course, your savings will depend on local climate conditions and energy rates. But still—not too shabby, right?)
“YOU’RE ON IT.”
If you can drill a few holes, install some screws, connect wires and lift at least 35 pounds, you can install a ceiling fan—all by yourself. (So if you’re looking to rack up points for an “all day” project, you’ll have to find something else to do.).


